You can make a small patio feel useful long before you buy a matching furniture set. Start with the way you want to spend an ordinary day outside, then give that activity enough space to happen comfortably.
A tape measure and a temporary layout will tell you more than a styled product photograph. This guide helps you turn a tight rectangle, an awkward corner, or a door-lined slab into a shopping brief you can actually use.
Give your patio one main job
Picture the moment you are most likely to step outside: coffee before work, dinner with someone you live with, or a quiet hour with a book. Make that your first layout problem, rather than trying to fit every possible occasion into the same space.
If you eat outside twice a week but host a crowd twice a year, plan around your everyday meals. Folding extra chairs can solve an occasional gathering more gracefully than permanent seating that makes every morning feel cramped.
Write a short sentence such as, “You need a comfortable place for two people to have breakfast, with room to reach the garden.” That sentence becomes your filter when a beautiful but oversized lounge set catches your eye.
Draw the space you can actually use
Measure the patio’s width and depth, then draw its outline on graph paper. Add every fixed feature that steals usable space, including steps, columns, raised planters, outdoor equipment, and the part of a door that swings outward.
For an irregular patio, split the drawing into simple rectangles and note the dimensions of each. Keep the measurements attached to the drawing so you do not accidentally shop from a photograph that hides a narrow pinch point.
Measure at the floor and again around the height of a tabletop or chair back if the boundary changes. A low wall may leave your feet plenty of room while a projecting windowsill makes a tall chair awkward.
POLYWOOD’s furniture planner starts with measuring your outdoor area, and its dining guide emphasizes room for chairs and circulation. Use that basic principle here; the layout exercise below is an original example, not a building-code or accessibility standard.
Protect the route through the patio
Trace the journey from the house to the steps, gate, hose, or garden before placing a table. If that route cuts through someone’s seat, the furniture may fit on paper but still interrupt everyday life.
Think about what you carry along the route: a tray, a laundry basket, or a watering can changes the space you use. Test the route with the person who will actually use it, including any mobility equipment they normally need.
Keep access to doors, drains, service equipment, and required exits clear. When a route has legal or accessibility requirements, check the rules that apply to your property rather than treating a furniture diagram as an approved clearance plan.

Measure furniture while someone uses it
A table’s diameter is only the beginning of its footprint. You also need space for the chairs, the person sitting in them, and the movement involved in getting in and out.
Look for overall chair dimensions as well as seat dimensions, and keep those measurements separate. A wide seat is useful information for the person sitting down; the outer frame tells you whether the chair will hit the wall.
If a listing gives one ambiguous length, ask the seller what it measures before relying on it. Do not assume that a chair tucks completely under a table just because the pieces are sold as a set.
Borrow chairs of a similar size for your mockup if you can. Their backs, armrests, and legs make the space feel real in a way that a small rectangle of tape cannot.
Try a width-and-depth example
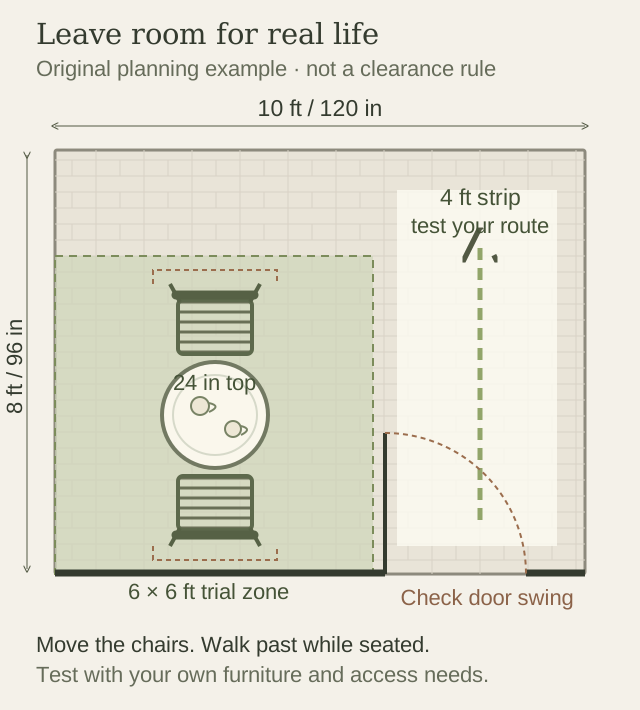
Imagine a rectangular patio that is 10 feet wide and 8 feet deep. Those are separate lengths: 120 inches by 96 inches, not a single area from which you can subtract a walking distance.
In this example, you pencil in a 6-by-6-foot trial zone on one side for a small table and two chairs. That leaves a 4-foot-wide strip beside it and a 2-foot band beyond it, provided the patio is otherwise unobstructed.
Those leftover strips are arithmetic, not promised clearances. A door swing, a large plant, or a chair pulled farther back can still use them up, so you must check the actual arrangement.
The drawing below shows this trial layout with a 24-inch table, not a specification for every bistro set. Move the chairs, walk the route, and change the zone until the layout works for the people using your patio.
Check the spot at the time you will use it
Visit your proposed seat at breakfast, lunchtime, and early evening over a couple of days. Note where direct sun lands, which window reflects glare, and whether a wall or fence blocks the breeze you were counting on.
After rain, look for puddles and the direction water takes across the surface. Furniture placement will not repair a drainage problem, and a rug should not become your way of hiding a persistently wet patch.
If shade is essential, plan its footprint along with the seating. An umbrella also needs a compatible base and room to operate, while fixed shade structures may need professional design or property approval.
Live with the mockup before ordering
Mark the tabletop and the outer chair positions using removable tape that is suitable for your surface. Avoid leaving tape where it can lift, stain, or become a trip hazard, and remove it after your test.
Open the door fully, carry a tray outside, pull out a chair, and sit down. Ask someone else to walk past while you stay seated, rather than clearing the furniture out of the way for the test.
Then try the small chores that usually get forgotten: sweeping around the legs, reaching a planter, and bringing a cushion indoors. If each job requires moving the whole set, consider a smaller table or a different orientation.
Photograph the successful arrangement from above or from the doorway and write its dimensions on your plan. Keep one alternative layout too, so a sold-out product does not send you back to the beginning.
Turn the drawing into a shopping brief
Make three lists: dimensions the furniture must fit, features you would like, and extras that can wait. Your first list might include a maximum table diameter, a chair-frame width, and a folded size that fits a storage corner.
Choose materials only after you have a workable shape. Ask what the exact product needs for cleaning, weather protection, and storage, then compare that routine with the time and indoor space you actually have.
Include delivery, any required assembly, covers, and cushion storage in your spending limit. A smaller set that is easy to put away may serve you better than a larger bargain that forces you to buy several more things.
Before checkout, match the selected color and model to the dimensions you saved, and read the current return terms. Keep the product instructions with your drawing so future replacements start with the same useful information.
Take one final walk through
Your patio is ready for a purchase when you can explain what happens there, where people walk, and where the furniture goes when the weather changes. The goal is a place you use easily, rather than a collection of things that technically fit.
Start with the essential pieces and spend a few ordinary days outside before adding more. The empty corner you were tempted to fill may turn out to be the part that makes the whole patio work.